1: Evolution of Cloud and Infrasructure as Code
Examine the evolution of virtualization technologies from bare metal, virtual machines, and containers and the tradeoffs between them.
2: Terraform Overview & Set Up
Install terraform and configure it to work with AWS
3: Basic Terraform Usage
Learn the common terraform commands and how to use them
•Terraform Plan, Apply, Destroy
4: Variables and Outputs
Use Terraform variables and outputs to improve make our configurations more flexible
5: Additional HCL Features
Explore HCL language features in Terraform to create more expressive and modular infrastructure code.
6: Terraform Modules
Learn to break your code into modules to make it flexible and reuseable
7: Managing Multiple Environments
Overview of two primary methods for managing multiple Terraform environments
8: Testing Terraform Code
Techniques for testing and validating Terraform code
9: Developer Workflows
Covers how teams generally work with Terraform, including automated deployment with CI/CD

Using Terraform Workspaces to Manage Environments
In this lesson, we will demonstrate how to use Terraform Workspaces to manage multiple environments for our sample web application.
We will create two environments, production and staging, and deploy the web application to both environments.
Defining the Root Module
-
Create a new directory called
workspace. This directory will contain themain.tffile for the Terraform workspace implementation. -
Inside the
main.tffile, set up the backend and providers, as we did in previous examples.
terraform {
  # Assumes s3 bucket and dynamo DB table already set up
  # See /code/03-basics/aws-backend
  backend "s3" {
    bucket         = "devops-directive-tf-state"
    key            = "07-managing-multiple-environments/workspaces/terraform.tfstate"
    region         = "us-east-1"
    dynamodb_table = "terraform-state-locking"
    encrypt        = true
  }

  required_providers {
    aws = {
      source  = "hashicorp/aws"
      version = "~> 3.0"
    }
  }
}
- Add a variable for the sensitive password value.
variable "db_pass" {
  description = "password for database"
  type        = string
  sensitive   = true
}
- Make use of the workspace's name for postfixing certain resources, such as the S3 bucket, to avoid naming conflicts.
locals {
  environment_name = terraform.workspace
}

resource "aws_s3_bucket" "bucket" {
  bucket = "web-app-data-${local.environment_name}"
}
- Populate all the input variables for the module so it knows how to provision the environment.
module "web_app" {
  source = "../../06-organization-and-modules/web-app-module"

  # Input Variables
  bucket_prefix    = "web-app-data-${local.environment_name}"
  domain           = "devopsdeployed.com"
  environment_name = local.environment_name
  instance_type    = "t2.micro"
  create_dns_zone  = terraform.workspace == "production" ? true : false
  db_name          = "${local.environment_name}mydb"
  db_user          = "foo"
  db_pass          = var.db_pass
}
- Use conditionals to determine whether to provision the DNS zone or use an existing one based on the environment (production or staging).
  ...
  create_dns_zone  = terraform.workspace == "production" ? true : false
  ...
Creating Production and Staging Environments
-
Initialize Terraform using
terraform init. -
Create a new environment called "production" using the command
terraform workspace new production. To verify the creation, useterraform workspace list. -
Deploy the environment using
terraform apply. Pass the sensitive database password during runtime. -
Once the production environment is created, create another environment called "staging" using
terraform workspace new staging. -
Deploy the staging environment using
terraform apply. Pass the sensitive database password during runtime. -
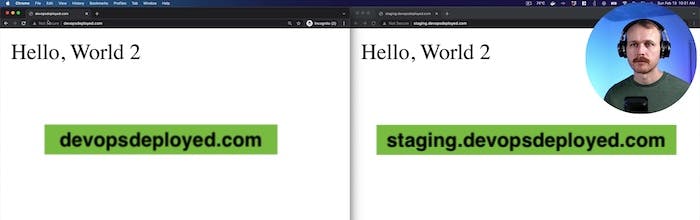
As a result, two copies of the web application will be running, one at
MY_DOMAIN.com(production) and the other atstaging.MY_DOMAIN.com(staging).
Cleanup
To avoid incurring additional costs by leaving the infrastructure running, you can destroy destroy both environments using the terraform destroy command.
You will need ot switch to each environment using the terraform workspace select WORKSPACE_NAME followed by terraform destroy
In this lesson, we demonstrated how to use Terraform Workspaces to manage multiple environments for our sample web application.
We created two environments, production and staging, and deployed the web application to both environments, all from the same codebase.