1: History and Motivation
Examine the evolution of virtualization technologies from bare metal, virtual machines, and containers and the tradeoffs between them.
2: Technology Overview
Explores the three core Linux features that enable containers to function (cgroups, namespaces, and union filesystems), as well as the architecture of the Docker components.
3: Installation and Set Up
Install and configure Docker Desktop
4: Using 3rd Party Container Images
Use publicly available container images in your developer workflows and learn how about container data persistence.
5: Example Web Application
Building out a realistic microservice application to containerize.
6: Building Container Images
Write and optimize Dockerfiles and build container images for the components of the example web app.
7: Container Registries
Use container registries such as Dockerhub to share and distribute container images.
8: Running Containers
Use Docker and Docker Compose to run the containerized application from Module 5.
9: Container Security
Learn best practices for container image and container runtime security.
10: Interacting with Docker Objects
Explore how to use Docker to interact with containers, container images, volumes, and networks.
11: Development Workflow
Add tooling and configuration to enable improved developer experience when working with containers.
•Developer Experience Wishlist
12: Deploying Containers
Deploy containerized applications to production using a variety of approaches.
Understanding data persistence
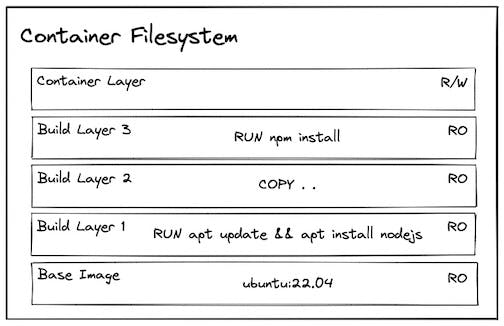
When we create a container from a container image, everything in the image is treated as read-only, and there is a new layer overlayed on top that is read/write.
A. Installing Dependencies:
Let's experiment with how installing something into a container at runtime behaves!
Note: Modifying the contents of a container at runtime is not something you would normally do. We are doing it here for instructional purposes only!
# Create a container from the ubuntu image
docker run --interactive --tty --rm ubuntu:22.04

# Try to ping google.com
ping google.com -c 1 # This results in `bash: ping: command not found`

# Install ping
apt update
apt install iputils-ping --yes

ping google.com -c 1 # This time it succeeds!
exit
Let's try that again:
docker run -it --rm ubuntu:22.04
ping google.com -c 1 # It fails! 🤔
It fails the second time because we installed it into that read/write layer specific to the first container, and when we tried again it was a separate container with a separate read/write layer!
We can give the container a name so that we can tell docker to reuse it:
# Create a container from the ubuntu image (with a name and WITHOUT the --rm flag)
docker run -it --name my-ubuntu-container ubuntu:22.04

# Install & use ping
apt update
apt install iputils-ping --yes
ping google.com -c 1
exit

# List all containers
docker container ps -a | grep my-ubuntu-container
docker container inspect my-ubuntu-container

# Restart the container and attach to running shell
docker start my-ubuntu-container
docker attach my-ubuntu-container

# Test ping
ping google.com -c 1 # It should now succeed! 🎉
exit
We generally never want to rely on a container to persist the data, so for a dependency like this, we would want to include it in the image:
# Build a container image with ubuntu image as base and ping installed
docker build --tag my-ubuntu-image -<<EOF
FROM ubuntu:22.04
RUN apt update && apt install iputils-ping --yes
EOF

# Run a container based on that image
docker run -it --rm my-ubuntu-image

# Confirm that ping was pre-installed
ping google.com -c 1 # Success! 🥳
The FROM... RUN... stuff is part of what is called a Dockerfile that is used to specify how to build a container image. We will go much deeper into building containers later in the course, but for now just understand that for anything we need in the container at runtime we should build it into the image!
The one exception to this rule is environment specific configuration (environment variables, config files, etc...) which can be provided at runtime as a part of the environment (see: https://12factor.net/config).
B. Persisting Data Produced by the Application:
Often, our applications produce data that we need to safely persist (e.g. database data, user uploaded data, etc...) even if the containers are destroyed and recreated. Luckily, Docker (and containers more generally) have a feature to handle this use case called Volumes and mounts!

Volumes and mounts allow us to specify a location where data should persist beyond the lifecycle of a single container. The data can live in a location managed by Docker (volume mount), a location in your host filesystem (bind mount), or in memory (tmpfs mount, not pictured).
NOTE: This third option (tmpfs mount) does not persist the data after the container exits, and is instead used as a temporary store for data you specifically DON'T want to persist (for example credential files). It is included here for completeness but should not be used for application data you want to persist.
Let's experiment with how creating some data within a container at runtime behaves!
# Create a container from the ubuntu image
docker run -it --rm ubuntu:22.04

# Make a directory and store a file in it
mkdir my-data
echo "Hello from the container!" > /my-data/hello.txt

# Confirm the file exists
cat my-data/hello.txt
exit
If we then create a new container, (as expected) the file does not exist!
# Create a container from the ubuntu image
docker run -it --rm ubuntu:22.04

# Check if the file exists
cat my-data/hello.txt # Produces error: `cat: my-data/hello.txt: No such file or directory`
i. Volume Mounts
We can use volumes and mounts to safely persist the data.
# create a named volume
docker volume create my-volume

# Create a container and mount the volume into the container filesystem
docker run  -it --rm --mount source=my-volume,destination=/my-data/ ubuntu:22.04
# There is a similar (but shorter) syntax using -v which accomplishes the same
docker run  -it --rm -v my-volume:/my-data ubuntu:22.04

# Now we can create and store the file into the location we mounted the volume
echo "Hello from the container!" > /my-data/hello.txt
cat my-data/hello.txt
exit
We can now create a new container and mount the existing volume to confirm the file persisted:
# Create a new container and mount the volume into the container filesystem
docker run  -it --rm --mount source=my-volume,destination=/my-data/ ubuntu:22.04
cat my-data/hello.txt # This time it succeeds!
exit
Where is this data located? On linux it would be at /var/lib/docker/volumes... but remember, on docker desktop, Docker runs a linux virtual machine.
One way we can view the filesystem of that VM is to use a container image created by justincormat that allows us to create a container within the namespace of PID 1. This effectively gives us a container with root access in that VM.
*NOTE: Generally you should be careful running containers in privileged mode with access to the host system in this way. Only do it if you have a specific reason to do so and you trust the container image.*
# Create a container that can access the Docker Linux VM
# Pinning to the image hash ensures it is this SPECIFIC image and not an updated one helps minimize the potential of a supply chain attack
docker run -it --rm --privileged --pid=host justincormack/nsenter1@sha256:5af0be5e42ebd55eea2c593e4622f810065c3f45bb805eaacf43f08f3d06ffd8

# Navigate to the volume inside the VM at:
ls /var/lib/docker/volumes/my-volume/_data
cat /var/lib/docker/volumes/my-volume/_data/hello.txt # Woohoo! we found our data!
This approach can then be used to mount a volume at the known path where a program persists its data:
# Create a container from the postgres container image and mount its known storage path into a volume named pgdata
docker run -it --rm -v pgdata:/var/lib/postgresql/data -e POSTGRES_PASSWORD=foobarbaz postgres:15.1-alpine
ii. Bind Mounts
Alternatively, we can mount a directory from the host system using a bind mount:
# Create a container that mounts a directory from the host filesystem into the container
docker run  -it --rm --mount type=bind,source="${PWD}"/my-data,destination=/my-data ubuntu:22.04
# Again, there is a similar (but shorter) syntax using -v which accomplishes the same
docker run  -it --rm -v ${PWD}/my-data:/my-data ubuntu:22.04

echo "Hello from the container!" > /my-data/hello.txt

# You should also be able to see the hello.txt file on your host system
cat my-data/hello.txt
exit
Bind mounts can be nice if you want easy visibility into the data being stored, but there are a number of reasons outlined at https://docs.docker.com/storage/volumes/ (including speed if you are running Docker Desktop on windows/mac) for why volumes are preferred.