1: History and Motivation
Examine the evolution of virtualization technologies from bare metal, virtual machines, and containers and the tradeoffs between them.
2: Technology Overview
Explores the three core Linux features that enable containers to function (cgroups, namespaces, and union filesystems), as well as the architecture of the Docker components.
3: Installation and Set Up
Install and configure Docker Desktop
4: Using 3rd Party Container Images
Use publicly available container images in your developer workflows and learn how about container data persistence.
5: Example Web Application
Building out a realistic microservice application to containerize.
6: Building Container Images
Write and optimize Dockerfiles and build container images for the components of the example web app.
7: Container Registries
Use container registries such as Dockerhub to share and distribute container images.
8: Running Containers
Use Docker and Docker Compose to run the containerized application from Module 5.
9: Container Security
Learn best practices for container image and container runtime security.
10: Interacting with Docker Objects
Explore how to use Docker to interact with containers, container images, volumes, and networks.
11: Development Workflow
Add tooling and configuration to enable improved developer experience when working with containers.
•Developer Experience Wishlist
12: Deploying Containers
Deploy containerized applications to production using a variety of approaches.
React Client Dockerfile
In this section of the course we will build out a Dockerfile for the React Client API, starting with a simple naive approach, and systematically improving it!
Emoji Legend:
🔒 - Security improvement
🏎️ - Build speed improvement
👁️ - Clarity improvement
The Dockerfile for our React based front end is kind of a hybrid between the NodeJS api and the Golang api Dockerfiles. We will use Node + NPM at first, but then build our site as static HTML, CSS, and JS files that we will serve using a separate deployable stage.
Naive Implementation
The naive implementation should look very familiar, since it't nearly identical to that of the Node API.
Running a container from this image will run our vite development server.
FROM node
COPY . .
RUN npm install
CMD ["npm", "run", "dev"]
Pin the Base Image (🔒+🏎️)
As always, we want to use a specific version of our base image to avoid nasty surprises when the upstream latest tag changes.
#-------------------------------------------
# Pin specific version for stability
FROM node:19.4-bullseye
#-------------------------------------------
COPY . .
RUN npm install
CMD ["npm", "run", "dev"]
Set WORKDIR and COPY package.json File
We want to specify a working directory other than / and separate out the COPY commands for our package.json and package-lock.json files to improve caching.
FROM node:19.4-bullseye
#-------------------------------------------
# Specify working directory other than /
WORKDIR /usr/src/app
# Copy only files required to install dependencies (better layer caching)
COPY package*.json ./
#-------------------------------------------
RUN npm install
COPY . .
CMD ["npm", "run", "dev"]
Use a Cache Mount (🏎️)
To help speed up dependency installation we can add a cache mount and tell npm to use it.
FROM node:19.4-bullseye
WORKDIR /usr/src/app
COPY package*.json ./
#-------------------------------------------
# Use cache mount to speed up install of existing dependencies
RUN --mount=type=cache,target=/usr/src/app/.npm \
  npm set cache /usr/src/app/.npm && \
  npm install
#-------------------------------------------
COPY . .
CMD ["npm", "run", "dev"]
Separate Build and Deploy Stages
Our React app will be built into a set of static files (HTML, CSS, and JS) that we can then deploy in a variety of ways.
Here we will build the application in one stage and then copy those into a second stage running Nginx!
FROM node:19.4-bullseye AS build
WORKDIR /usr/src/app
COPY package*.json ./
RUN --mount=type=cache,target=/usr/src/app/.npm \
  npm set cache /usr/src/app/.npm && \
  npm install
COPY . .
RUN npm run build
#-------------------------------------------
# Use separate stage for deployable image
FROM nginxinc/nginx-unprivileged:1.23-alpine-perl
COPY nginx.conf /etc/nginx/conf.d/default.conf
COPY --from=build usr/src/app/dist/ /usr/share/nginx/html
EXPOSE 8080
#-------------------------------------------
Use COPY --link
One final tweak we can make is to use the COPY --link syntax in the second stage. This will allow us to avoid invalidating the layer cache if we change the second stage base image.
FROM node:19.4-bullseye AS build
WORKDIR /usr/src/app
COPY package*.json ./
RUN --mount=type=cache,target=/usr/src/app/.npm \
  npm set cache /usr/src/app/.npm && \
  npm install
COPY . .
RUN npm run build

FROM nginxinc/nginx-unprivileged:1.23-alpine-perl
#-------------------------------------------
# Use COPY --link to avoid breaking cache if we change the second stage base image
COPY --link nginx.conf /etc/nginx/conf.d/default.conf
COPY --link --from=build usr/src/app/dist/ /usr/share/nginx/html
#-------------------------------------------
EXPOSE 8080
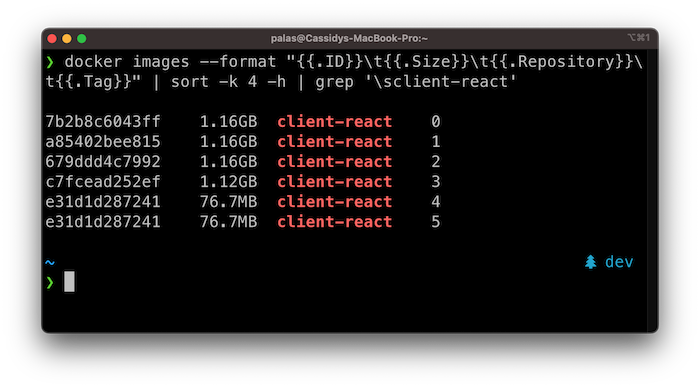
Image Size
As we progressed through these improvements, we reduced the final image size from 1.16GB (😳) to a much more reasonable 77MB (😎)!